In this blog post, we’re going to measure Temperature and Humidity by using DHT11 with Arduino. Here we also display those readings on an LCD Display.
The DHT11 Temperature and Humidity Sensor senses, measures and regularly reports the relative humidity in the air. It measures both moisture and air temperature. The warmer the air is, the more moisture it can hold, so relative humidity changes with fluctuations in the temperature.
Humidity sensors detect the relative humidity of immediate environments in which they are placed. They measure both moisture and temperature in the air and express relative humidity as a percentage of the ratio of moisture in the air to the maximum amount that can be held in the air at the current temperature. As the air becomes hotter, it holds more moisture, so the relative humidity changes with the temperature.
How does the DHT11 sensor work?
The DHT11 sensor operates by utilizing a thermistor to measure temperature and a humidity-sensitive capacitor to gauge the relative humidity in the surrounding environment. When connected to an Arduino board, the sensor sends digital signals that can be interpreted to obtain accurate readings of both temperature and humidity levels.
Inside the DHT11, changes in temperature cause resistance in the thermistor to vary, affecting the voltage drop across it. This change is then converted into a digital signal for processing. Similarly, fluctuations in humidity lead to alterations in capacitance within the sensor’s circuitry, which are also translated into digital data for analysis.
Components List
- Arduino
- DHT11 or DHT22
- Jumper Wires
- LCD Display 16×2
- 1 x Breadboard
Circuit Diagram of DHT11 with Arduino
Setting up the DHT11 sensor with Arduino is a straightforward process that can open up a world of possibilities for your projects. To begin, gather the necessary components including the DHT11 sensor, jumper wires, and an Arduino board.
Next, carefully connect the sensor to the designated pins on the Arduino board following the wiring diagram provided. Ensure each connection is secure to avoid any potential issues during operation.

Pin Connection of DHT11 with Arduino
| DHT11 | Arduino Pins |
|---|---|
| Vcc +5v | 5v |
| GND | GND |
| Vout (out) | A0 |
DHT11 Library For Below Code
When working with the DHT11 sensor and Arduino, utilizing the DHT11 Library can simplify the process of reading data from the sensor. This library provides functions specifically designed for interacting with the DHT11 sensor, making it easier to access temperature and humidity readings accurately.
You need to install the below DHT11 library. Just download the below library and open Arduino IDE. Now go to Sketch > Include Library > Add .Zip Library.
Code for DHT11 with Arduino
To begin, you’ll need to download the DHT sensor library for Arduino. This library makes it easy to communicate with the DHT11 sensor and retrieve temperature and humidity data.
Next, open your Arduino IDE and create a new sketch. Include the necessary libraries at the top of your code using #include directives.
Now, initialize the DHT sensor by specifying its pin number on the Arduino board. You can then read data from the sensor using functions like .read11().
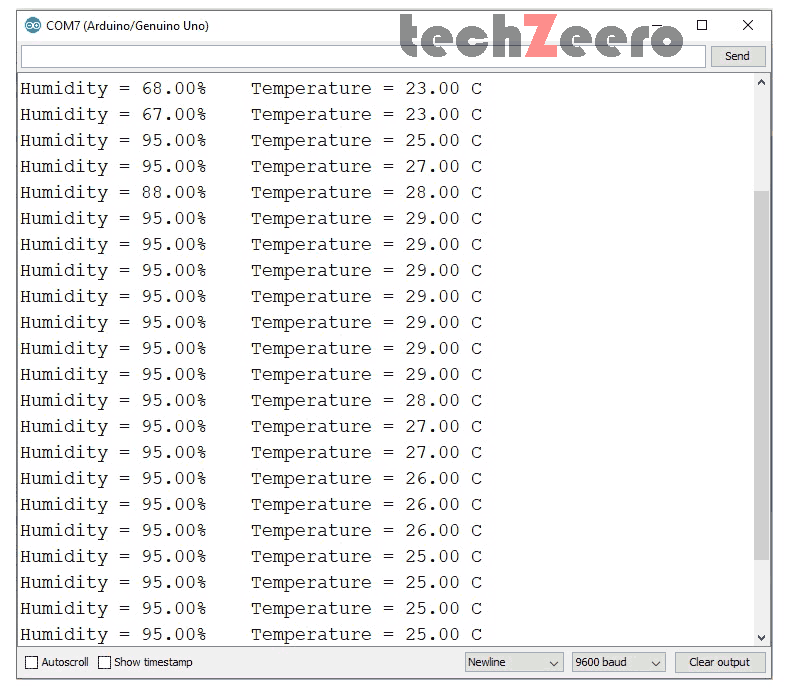
Output
Once you’ve collected the sensor data, you can see it on your serial monitor.
Code using Adafruit Unified Sensor Library for DHT11 and DHT22
When working with the DHT11 and DHT22 sensors in conjunction with Arduino, utilizing the Adafruit Unified Sensor Library can streamline your coding process. This library offers a unified way to interact with various sensors, including these temperature and humidity sensors.
By incorporating the Adafruit Unified Sensor Library into your code, you can access functions that simplify sensor data readings. This makes it easier to retrieve accurate temperature and humidity values from the DHT11 or DHT22 sensor connected to your Arduino board.
- Adafruit Unified Sensor Library: https://github.com/adafruit/Adafruit_Sensor
- DHT Sensor Library: https://github.com/adafruit/DHT-sensor-library
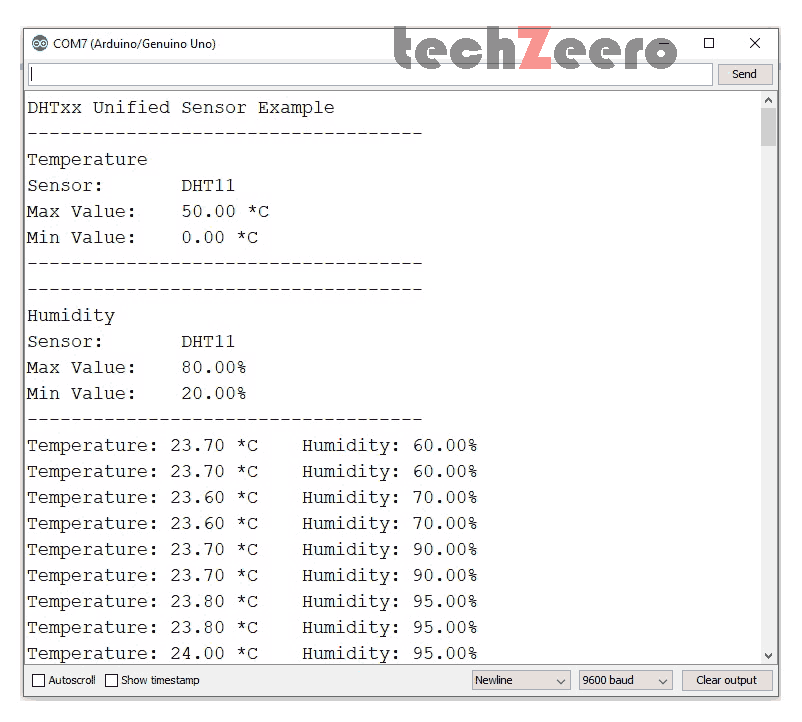
Output
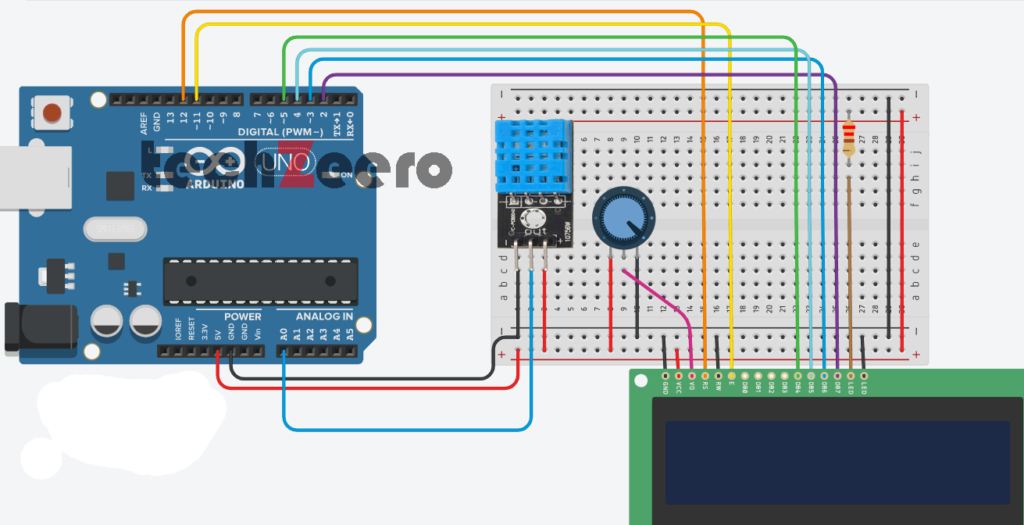
Circuit Diagram of DHT11 and LCD with Arduino
Now we will display the temperature and humidity readings on the LCD 16×2 display.
When integrating a DHT11 sensor with an LCD display and Arduino, the circuit diagram is crucial for proper functionality. The connection involves linking the data pin of the DHT11 to a digital pin on the Arduino, along with connecting power and ground pins.
For adding an LCD display into the mix, you’ll need to connect its data pins to specific digital pins on your Arduino board. This allows for displaying temperature and humidity readings from the DHT11 sensor in real-time.
Learn More about LCD :- LCD with Arduino
Code for DHT11 and LCD with Arduino
Now, let’s dive into the exciting world of coding with the DHT11 sensor and an LCD display using Arduino. Connecting these components allows you to not only measure temperature and humidity but also display this data in real-time on a screen.
To start coding for this setup, you’ll need to utilize libraries that support both the DHT11 sensor and the LCD display. By integrating these libraries into your Arduino IDE, you can easily access functions that will enable communication between the sensor, Arduino board, and LCD screen.
The code for this project involves reading data from the DHT11 sensor, formatting it correctly, and then displaying it on the LCD screen. With proper syntax and commands in your sketch, you can ensure that accurate readings are obtained and shown dynamically on the display.
Practical applications of DHT11 sensor
The DHT11 sensor’s versatility makes it a valuable tool in various practical applications.
- One common use is in home automation systems to monitor indoor climate conditions, ensuring optimal comfort levels.
- In agriculture, the sensor can be employed in greenhouse environments to regulate temperature and humidity for plant growth. It aids meteorologists in weather stations by collecting data for analyzing trends and forecasting changes.
- DHT11 sensors are also handy in warehouses to maintain ideal storage conditions for perishable goods. They play a crucial role in HVAC systems for efficient energy management based on real-time environmental data.
- Furthermore, researchers utilize these sensors in experiments requiring precise monitoring of temperature and humidity levels. Whether used domestically or industrially, the DHT11 sensor proves its value across a wide range of practical fields.
Troubleshooting common issues
Having trouble with your DHT11 sensor while using it with Arduino? Don’t worry, common issues can arise but they are usually easy to troubleshoot.
- If you’re having inaccurate readings, double-check the connections between the DHT11 sensor and Arduino. Loose or incorrect wiring can lead to faulty data.
- Another issue could be related to the power supply. Ensure that the sensor is receiving a stable power source within its operating range.
- Inconsistent readings might also be caused by interference from other electronic devices nearby. Try moving your setup to a less noisy environment.
- If your DHT11 isn’t responding at all, verify if you’re using the correct pins on the Arduino board and if there are any code errors.